
|
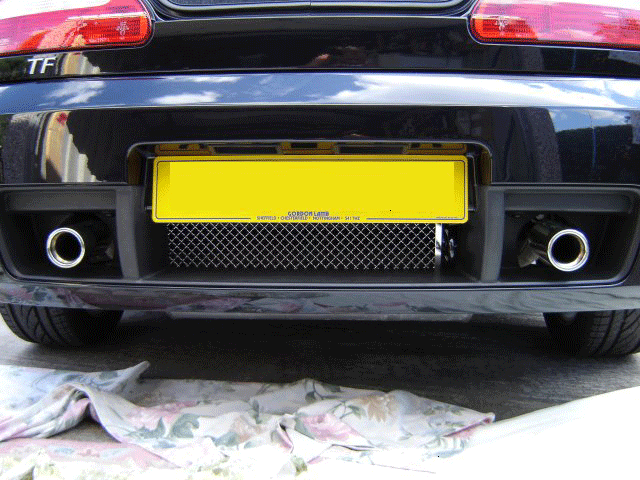
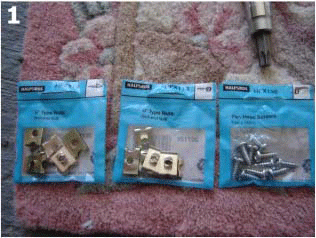
1. If you haven't got any fixings with your grill, like the Mike
Satur one, you will need to buy 2 packs of "U" type nuts HFX113
(no.6/no.8) and 1 pack of Pan head screws HFX136 (no.8 13mm) from
Halfords. While in Halfords, buy a tube of liquid thread lock too if
you haven't any. |
|
|
2. Tools you will need are only a pozi drive screwdriver, a right
angled pozidrive, socket set 1/2" or 3/8",and a torx bit TX50
(again, available from Halfords). |
 |
|
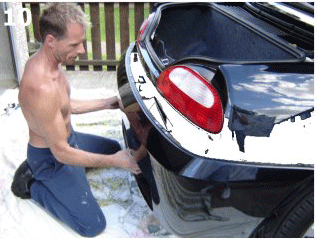
3. Open the boot and pull out the light (falls out), and remove the
bulb by twisting it and pulling it out. |
 |
|
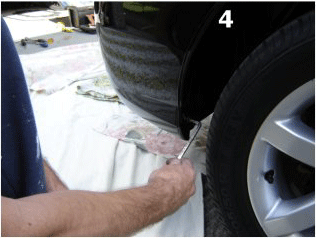
4. Remove the pozidrive screw and its washer on the lower front edge
of the rear bumper, and the same on the other side. If you cannot get a screwdriver to fit, then the wheel will have to come off to facilitate access!! Best get a screwdriver to fit! |
 |
|
5. Remove the pozidrive self tapping screw located in the wheel arch
in the top of the rear bumper. There's a small cut out in the
moulding to help you see it! Repeat for the other side. |
 |
|
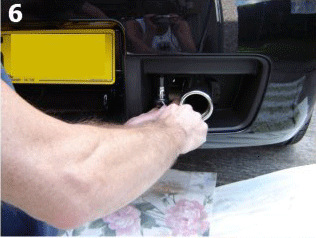
6. Using your torx bit and drive, remove both torx bolts located
above and to one side of the exhaust outlets. |
 |
|
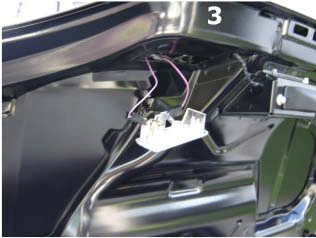
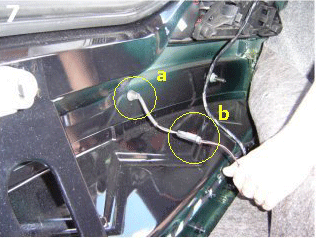
7. Working inside the boot now....pull back the carpet from the rear
bulkhead for access. Disconnect the number plate lighting cable by pulling apart the connector at "b" then pushing the rubber grommet AND the cable out of the hole towards the back of the car. Do this for BOTH cables. |
 |
|
8. Undo and remove the nut located below the rear light cluster on
both sides. |
 |
|
9. Finally remove the centre nut located below the boot lid catch. |
 |
|
10. Make sure you have a piece of carpet or plenty of dustsheets all
ready to place the bumper on. No simply slide the whole rear bumper backwards and away from the car making sure those 2 cables aren't caught on anything. This can be done on your own, but the aid of a pretty assistant makes it so much easier. I wouldn't know as she was taking pix at the time! |
 |
|
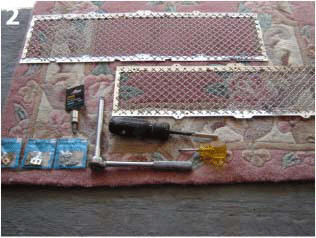
11. With the bumper placed face down on the piece of carpet or
dustsheets to protect the paintwork....push on the 10 "U" type nuts. |
 |
|
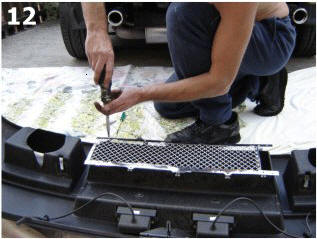
12. Place your new shiny grill onto the bumper cut-out. Make sure it
is facing the right way e.g.." nice" side towards the bottom. Also
make sure the cut-out IS located on the correct side for the towing
eye to go through. In this instance on the left. Now screw in the ten screws loosely using a drop of liquid thread lock onto the threads to make sure they never loosen. Make sure the grill is lined up correctly with the cut-out, then tighten all 10 screws. |
 |
|
Refitting. Refitting is simply a reversal of the removal procedure (You should write a Haynes Manual Spike, Ed). 1.Place BOTH of the lighting cables into the 2 holes in the rear bulkhead and feed the cable through as much as possible. 2.Offer up the bumper and line up the 3 fixing bolts on the bumper with the 3 holes in the bulkhead, and push the bumper home. Refit the 2 outer nuts and the central one, and tighten fully.(25Nm for you engineers out there ) 3.Reconnect BOTH cables and pull back through-into place both rubber grommets. Push back into place the boot carpet. 4.Refit the 2 torx bolts located above the exhaust and tighten fully, or again, to 25Nm 5.Loosely refit the large pozidrive screw with a drop of thread lock on it, back into the hole at the top of the bumper (See Step 2,no.5 pic),line up the bumper with the surrounding body work and tighten. Repeat for the other side. 6.Loosely refit the small pozidrive screw and washer, again with a drop of thread lock on it, back into the lower forward edge of the bumper, and tighten fully. Repeat for the other side. 7.Refit the bulb into the bulb holder, by lining up the pins and slots, pushing in the half a turn to "lock it". Just like changing a bulb at home! 8.Turn on your side lights and check that BOTH number plate lights are working. Don't blame me if they're not!! WARNING>It is HIGHLY advisable to use liquid thread lock on the pozidrive screws that hold the bumper on, as these tend to work loose, then drop out onto the rear tyre, causing you to have a blow out! I know of two occurrences of this happening. |
Now stand back and admire your new rear!! Does that look better or what!
Notes.
I rate this job as a
![]()
![]()
![]() 3 spanner rating, as not everyone has access to a socket set, otherwise
anyone whose handy can do this job easily, and so it would warrant only a 2
spanner rating.
3 spanner rating, as not everyone has access to a socket set, otherwise
anyone whose handy can do this job easily, and so it would warrant only a 2
spanner rating.
Blind rating is high at
![]()
![]()
![]()
![]() 4 shades, as you cant miss the rear grill, it really does stand out. So its
not suitable for everyone.
4 shades, as you cant miss the rear grill, it really does stand out. So its
not suitable for everyone.
Please note, there are some TF's with 5 hole fixings. This is normal. Same
procedure as above, but only use the 5 fixings.
A rear grill can be bought on its own to match the standard grill set as
found on a TF, from MGOC, price about £70ish.To match it to the black
grills, simply spray it with grey primer, the a couple of coats of Halfords
Satin Black Spray paint. Matches perfect then.
Black grills are no longer available and no longer listed, according to
MGOC, only the "bright grill" is available now.
And that's it.