|
|
T-Bar - Removal
 Removal
of the transmission tunnel is a 4 or 5 part process depending on
whether you have a windstop or not. The 5 parts are: 1.Windstop
2.T-Bar 3.Drop down bin 4.Footwell illumination panels 5.Transmission
tunnel. Begin by removing your windstop (if you have one). There are
quite a number of windstops available for the F/TF and the one Scarlet
is fitted with is one of only 7 made in this finish, so your removal
instructions are likely to be different to mine. Scarlet has a Mike
Satur FX windstop in polished billet aluminium, but by far the most
common windstop is the standard MG mesh one and this is attached with
a pair of square mounting blocks on the top of the T-Bar. In my case
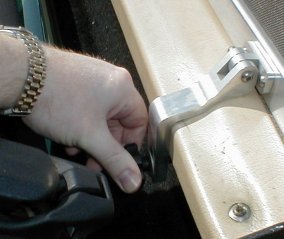
it was just a matter of undoing the pair of thumbscrews and then
unscrewing the concealed mounting bar fixings. Removal
of the transmission tunnel is a 4 or 5 part process depending on
whether you have a windstop or not. The 5 parts are: 1.Windstop
2.T-Bar 3.Drop down bin 4.Footwell illumination panels 5.Transmission
tunnel. Begin by removing your windstop (if you have one). There are
quite a number of windstops available for the F/TF and the one Scarlet
is fitted with is one of only 7 made in this finish, so your removal
instructions are likely to be different to mine. Scarlet has a Mike
Satur FX windstop in polished billet aluminium, but by far the most
common windstop is the standard MG mesh one and this is attached with
a pair of square mounting blocks on the top of the T-Bar. In my case
it was just a matter of undoing the pair of thumbscrews and then
unscrewing the concealed mounting bar fixings. |
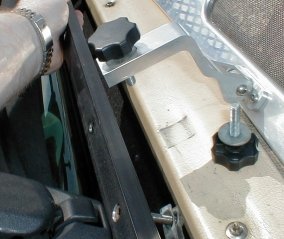
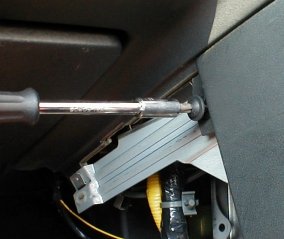
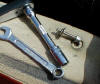
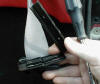
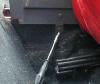
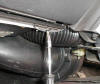
 This
picture shows the mounting bar and also the fixing bolts. Again, only
of interest if you have a Mike Satur FX billet aluminium windstop or
are intrigued by the design. Basically there is a mounting bar that
attaches to the aluminium angle below the T-Bar. This then has a pair
of threaded holes to take the thumbscrews. In my opinion, this is a
superb bit of design making initial fitting extremely easy (no need to
remove the T-Bar) and subsequent temporary removal even easier still
(just undo the thumbscrews). Nice one Mike. This
picture shows the mounting bar and also the fixing bolts. Again, only
of interest if you have a Mike Satur FX billet aluminium windstop or
are intrigued by the design. Basically there is a mounting bar that
attaches to the aluminium angle below the T-Bar. This then has a pair
of threaded holes to take the thumbscrews. In my opinion, this is a
superb bit of design making initial fitting extremely easy (no need to
remove the T-Bar) and subsequent temporary removal even easier still
(just undo the thumbscrews). Nice one Mike. |
 OK,
windstop removed, it's time to move on to the T-Bar. Begin by removing
the three tonneau cover fixings across the top with a Philips head
screwdriver. Now, if you have a Mk1 F then you will have three press
studs (as shown in the picture), if you have a later model MGF or a TF
then you are likely to have a single press stud in the middle and a
larger mushroom shaped stud each end. These are removed in the same
way as the press studs. Lastly, if you have a Mike Satur half tonneau
cover then there is a possibility you will have something a little
different. OK,
windstop removed, it's time to move on to the T-Bar. Begin by removing
the three tonneau cover fixings across the top with a Philips head
screwdriver. Now, if you have a Mk1 F then you will have three press
studs (as shown in the picture), if you have a later model MGF or a TF
then you are likely to have a single press stud in the middle and a
larger mushroom shaped stud each end. These are removed in the same
way as the press studs. Lastly, if you have a Mike Satur half tonneau
cover then there is a possibility you will have something a little
different. |
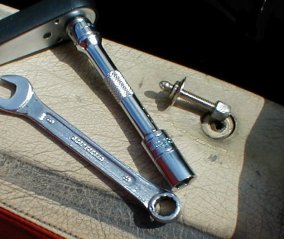
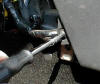
 Scarlet
has a Mike Satur tonneau cover which is secured with Tannex clips.
These are a secure method of attaching the cover and have only one
drawback - they are fiddly to remove! To undo the ones on Scarlet I
needed an 8mm spanner, an 8mm socket on a short extension piece and a
lot of patience! Scarlet
has a Mike Satur tonneau cover which is secured with Tannex clips.
These are a secure method of attaching the cover and have only one
drawback - they are fiddly to remove! To undo the ones on Scarlet I
needed an 8mm spanner, an 8mm socket on a short extension piece and a
lot of patience! |
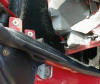 Apart
from the top fixings, the T-Bar is clipped into place with 3 pairs of
trim clips, a pair at each end and a pair in the middle. These are
released with a short, sharp tug of the T-Bar towards the dash (you
will need to pull both seats forwards to give you room). It is likely
that the male part of the trim clip will stay in the female part
making later re-fitting of the T-Bar imposable, use a pair of pliers
and carefully separate the two, you can now slide the male part back
onto it's button fixing on the T-Bar. The picture shows a pair at the
end and the next picture....... Apart
from the top fixings, the T-Bar is clipped into place with 3 pairs of
trim clips, a pair at each end and a pair in the middle. These are
released with a short, sharp tug of the T-Bar towards the dash (you
will need to pull both seats forwards to give you room). It is likely
that the male part of the trim clip will stay in the female part
making later re-fitting of the T-Bar imposable, use a pair of pliers
and carefully separate the two, you can now slide the male part back
onto it's button fixing on the T-Bar. The picture shows a pair at the
end and the next picture....... |
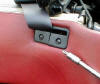
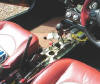
 ...shows
the pair of trim clips in the middle. It also shows the volumetric
alarm sensor attached to the top of the drop down bin - we shall come
to this in a moment. In the meantime, to get the T-Bar out of the way,
extend the seatbelts and hook the T-Bar over the seats. ...shows
the pair of trim clips in the middle. It also shows the volumetric
alarm sensor attached to the top of the drop down bin - we shall come
to this in a moment. In the meantime, to get the T-Bar out of the way,
extend the seatbelts and hook the T-Bar over the seats. |
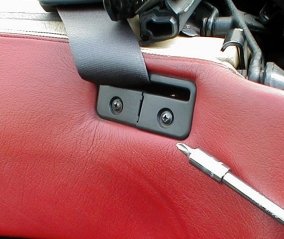
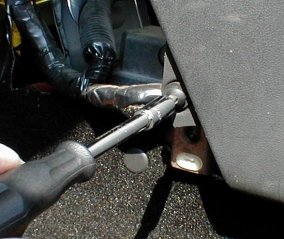
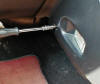
 To
remove the seat belt escutcheons it really is as simple as it looks,
unscrew the screws with a Philips head screwdriver. On early Fs these
screws locate into a metal plate behind the T-Bar, as you undo the
screws it may drop out, be ready to catch it. To
remove the seat belt escutcheons it really is as simple as it looks,
unscrew the screws with a Philips head screwdriver. On early Fs these
screws locate into a metal plate behind the T-Bar, as you undo the
screws it may drop out, be ready to catch it. |
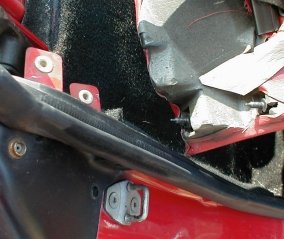
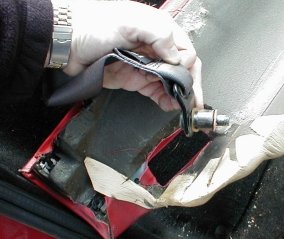
 As
mentioned, this picture shows the metal plate behind the seatbelt
escutcheons. I popped the escutcheon out of the T-Bar and the next
step is to thread the belt out of the it As
mentioned, this picture shows the metal plate behind the seatbelt
escutcheons. I popped the escutcheon out of the T-Bar and the next
step is to thread the belt out of the it |
 With
the escutcheons removed, you can now thread the end of the belts
through the T-Bar, the T-bar is now free of the car and can be
removed. With
the escutcheons removed, you can now thread the end of the belts
through the T-Bar, the T-bar is now free of the car and can be
removed. |
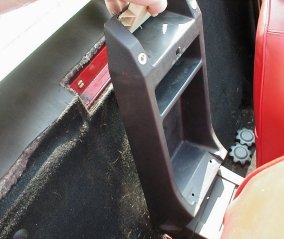
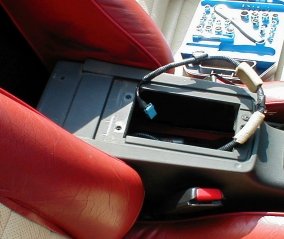
Drop
Down Bin - Removal
 The
next step is to remove the drop down bin. I removed the lid in the
'Dash (part 1)' gallery and now I am going to remove the main bin
itself. With the T-Bar removed you have access to the pair of fixing
screws and the volumetric alarm sensor. Note there are 4 screws here,
to remove the drop down bin you only need to undo the lower two with a
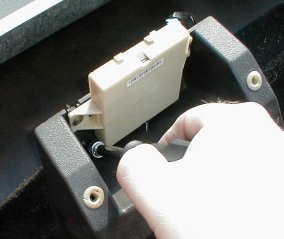
Philips head screwdriver as shown in the picture. The
next step is to remove the drop down bin. I removed the lid in the
'Dash (part 1)' gallery and now I am going to remove the main bin
itself. With the T-Bar removed you have access to the pair of fixing
screws and the volumetric alarm sensor. Note there are 4 screws here,
to remove the drop down bin you only need to undo the lower two with a
Philips head screwdriver as shown in the picture. |
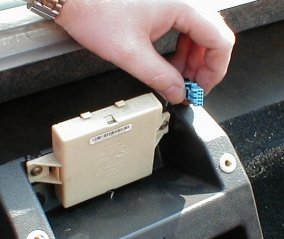
 Next
you need to unclip the multiplug from the sensor. I have seen 2
designs for this plug and Scarlet has the earlier blue one. There is a
white plug too (I have seen one on a Japanese import - the owner was
upgrading the alarm system to include the volumetric sensor). The
white plug is a different shape to the blue one so (obviously) it is
important, if you are adding this item to an imported car that the
plug and sensor are the same shape. Next
you need to unclip the multiplug from the sensor. I have seen 2
designs for this plug and Scarlet has the earlier blue one. There is a
white plug too (I have seen one on a Japanese import - the owner was
upgrading the alarm system to include the volumetric sensor). The
white plug is a different shape to the blue one so (obviously) it is
important, if you are adding this item to an imported car that the
plug and sensor are the same shape. |
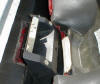
 OK,
easy part last. With the top screws removed and the volumetric sensor
unplugged, you can just lift the drop down bin free of the car. There
is also a surprise waiting for you in the rear carpet behind this
item, more on this later... OK,
easy part last. With the top screws removed and the volumetric sensor
unplugged, you can just lift the drop down bin free of the car. There
is also a surprise waiting for you in the rear carpet behind this
item, more on this later... |
Transmission Tunnel - Removal
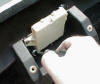
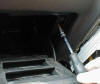
 With
both seats pulled forwards, undo the screw each side of the
transmission tunnel shown in the picture. With
both seats pulled forwards, undo the screw each side of the
transmission tunnel shown in the picture. |
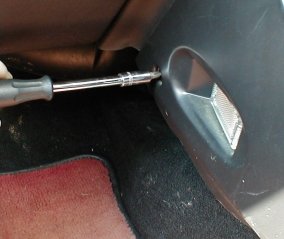
 Move
both the seats back and find the triangular panels in the foot well
with the lights in them. To get access to the remaining transmission
tunnel screws you need to remove these panels which is an easy job
comprising a pair of screws per panel and some wiring to unclip. Begin
by removing the lower screw as shown in the picture. Move
both the seats back and find the triangular panels in the foot well
with the lights in them. To get access to the remaining transmission
tunnel screws you need to remove these panels which is an easy job
comprising a pair of screws per panel and some wiring to unclip. Begin
by removing the lower screw as shown in the picture. |
 Again
using the Philips head screwdriver, remove the other screw by the
light. The panel is now loose and can be worked free (it has tabs that
slide behind the other panels). Again
using the Philips head screwdriver, remove the other screw by the
light. The panel is now loose and can be worked free (it has tabs that
slide behind the other panels). |
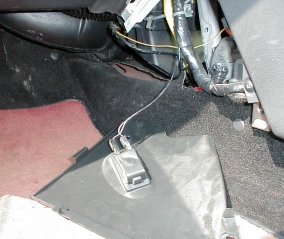
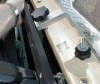
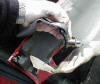
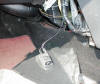 This
picture shows the back of the foot well illumination panel, disconnect
the wiring to remove the panel completely. It is worth noting the
yellow wire in the top of the picture. The image shows the passenger
foot well panel and the yellow wire is the receiving aerial for the
alarm blipper. In a normal F this is coiled up, but a better reception
(and therefore an increased range) can be had by unwinding this wire
and taping it as high as possible in a straight line. I have plans for
this wire in the rebuild. This
picture shows the back of the foot well illumination panel, disconnect
the wiring to remove the panel completely. It is worth noting the
yellow wire in the top of the picture. The image shows the passenger
foot well panel and the yellow wire is the receiving aerial for the
alarm blipper. In a normal F this is coiled up, but a better reception
(and therefore an increased range) can be had by unwinding this wire
and taping it as high as possible in a straight line. I have plans for
this wire in the rebuild. |
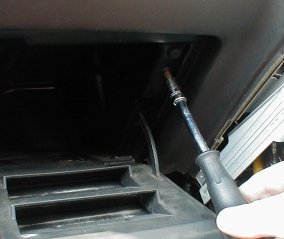
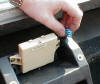
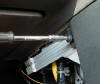 The
transmission tunnel itself is only secured with 6 screws, 2 of which
have already been removed behind the seats. The remaining 4 screws are
behind the foot well illumination panels and the top one is shown in
the picture. Remove with the Philips head screwdriver. The
transmission tunnel itself is only secured with 6 screws, 2 of which
have already been removed behind the seats. The remaining 4 screws are
behind the foot well illumination panels and the top one is shown in
the picture. Remove with the Philips head screwdriver. |
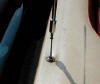
 This
picture shows the bottom screw for the transmission tunnel, remove and
then repeat the previous steps for the driver's side foot well. The
transmission tunnel is now free from the car and can be removed. This
picture shows the bottom screw for the transmission tunnel, remove and
then repeat the previous steps for the driver's side foot well. The
transmission tunnel is now free from the car and can be removed. |
 Nearly
there now, reach into the cubby box opening and thread the volumetric
alarm sensor cable back through the small opening in the back of the
transmission tunnel thus. Nearly
there now, reach into the cubby box opening and thread the volumetric
alarm sensor cable back through the small opening in the back of the
transmission tunnel thus. |
 OK,
to recap, you should have removed the handbrake gaiter and handle,
cubby box and drop down bin lids and the instrument fascia in addition
to the previous instructions (these other items are covered in the
'Dash (part 1)' gallery). You are now in a position to remove the
tunnel. Staying at the rear of the tunnel, pull it rearwards and
upwards until it 'jambs' on the handbrake handle (now you know why it
is so high when engaged!) You should now be able to work the front of
the tunnel past the dash and then lift the entire tunnel out of the
car. OK,
to recap, you should have removed the handbrake gaiter and handle,
cubby box and drop down bin lids and the instrument fascia in addition
to the previous instructions (these other items are covered in the
'Dash (part 1)' gallery). You are now in a position to remove the
tunnel. Staying at the rear of the tunnel, pull it rearwards and
upwards until it 'jambs' on the handbrake handle (now you know why it
is so high when engaged!) You should now be able to work the front of
the tunnel past the dash and then lift the entire tunnel out of the
car. |
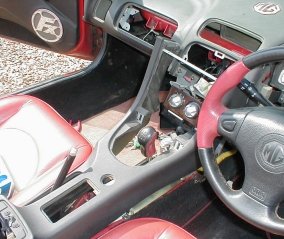
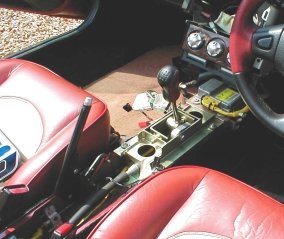
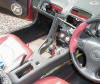
 This
picture shows the car with the tunnel removed. Note the brass-like
gear lever selector mechanism, this is one of Mike Satur's SSK (Slick
Shift Kits) and is something I wouldn't hesitate to recommend to
anyone. Also, note the yellow wiring next to it, with the exception of
the blipper aerial wire all the yellow wiring I have found in the F is
related to the Supplementary Restraint System (SRS - air bags and
seatbelt pre-tensioner). It is vitally important that before
disconnecting ANY of this wiring the battery is disconnected and then
left for a good 10 minutes as any residual current in the system can
cause the SRS components to fire when tampered with. Bearing in mind
that these items use explosives it is not a good idea to meddle with
them unduly! This
picture shows the car with the tunnel removed. Note the brass-like
gear lever selector mechanism, this is one of Mike Satur's SSK (Slick
Shift Kits) and is something I wouldn't hesitate to recommend to
anyone. Also, note the yellow wiring next to it, with the exception of
the blipper aerial wire all the yellow wiring I have found in the F is
related to the Supplementary Restraint System (SRS - air bags and
seatbelt pre-tensioner). It is vitally important that before
disconnecting ANY of this wiring the battery is disconnected and then
left for a good 10 minutes as any residual current in the system can
cause the SRS components to fire when tampered with. Bearing in mind
that these items use explosives it is not a good idea to meddle with
them unduly! |
Glove Box - Removal
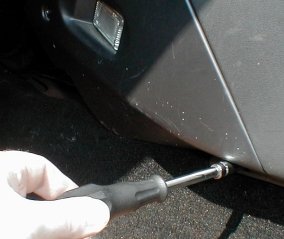
 The
other job I carried out was to remove the glove box. This is a very
simple job involving the removal of 4 screws. Begin by opening the
glove box door and locating the screw each side as shown in the
picture. Remove with the Philips head screwdriver, then I have found
it easier to close the door ready for the next step. The
other job I carried out was to remove the glove box. This is a very
simple job involving the removal of 4 screws. Begin by opening the
glove box door and locating the screw each side as shown in the
picture. Remove with the Philips head screwdriver, then I have found
it easier to close the door ready for the next step. |
 Underneath
the glove box are a further pair of screws. Note these are in a 'C'
shaped bracket so it is not necessary to remove them, only loosen. Underneath
the glove box are a further pair of screws. Note these are in a 'C'
shaped bracket so it is not necessary to remove them, only loosen. |
 With
the last pair of screws loosened you should be able to slide the
entire box forwards out of the dash. On top of the glove box is the
wiring to the light. Disconnect both sets of wires from the bulb and
switch on the door catch. The glove box is now free and can be removed
from the car. With
the last pair of screws loosened you should be able to slide the
entire box forwards out of the dash. On top of the glove box is the
wiring to the light. Disconnect both sets of wires from the bulb and
switch on the door catch. The glove box is now free and can be removed
from the car. |
|