Remove
the old hood as per the instructions on the hood removal page. Make
sure that all the holes are cleared and all traces of rivets have been
removed from them. There is no need to remove all the glue however.
Make sure that the two cables each side of the hood are in good
condition and not freyed. |
|||||
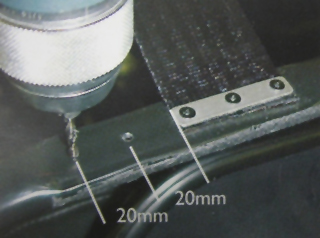
| Webbing
straps are required to be attached to the hood frame for the glass
screen to fold back properly. This is the only bit of the original BAS
instructions that is a little unclear. The straps are fixed to the
frame with two rivets and a metal frame. First ensure that the webbing
is not freying at the edges. If it is, carefully re seal it using a
naked flame (such as that from a lighter) to weld the fibres again. Be
careful not to set light to it! You will need to drill holes in the
frame. You should have been supplied with a 3.2mm drill bit. An 1/8 th
inch bit will do the job too. Use the metal plates as a guide to get
the holes in the right location as indicated in Figures 1 and 2 below. |
|||||
 |
|||||
Figure 1 |
|||||
The holes need to be drilled on the outside of the frame with respect to the existing webbing strap that can be seen in the picture. Figure 1 was photographed by someone standing behind the car, slightly to the left hand side, facing towards the front of the car. |
|||||
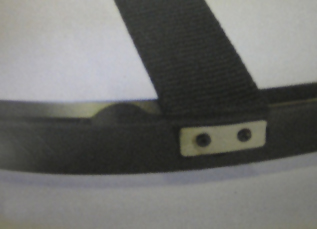
The other end of the strap is attached to the rear clamping bar. This is the very part, that is clipped in place by the clips under the parcel shelf carpet. The strap goes over the top of the bar and is fixed on boot side of the bar. Please note the notch in the bar. The strap should be fixed inboard of the notch as shown in Figure 3. |
|||||
 |
|||||
Figure 2 |
|||||
Figure 2 was photographed by someone standing on the drivers side of the car, by the rear wheel, facing towards the boot of the car. Please note the straps must be fixed inboard of the notch, so that the two straps are parallel with one another. Placed here, they will nestle perfectly along the edge of the glass screen when the hood is up. Putting them the wrong side of the notch leads to them sticking out like this: / \ rather than this: | | and then they are under too much tension and the hood becomes very difficult to close properly. |
|||||
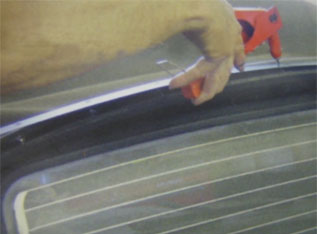
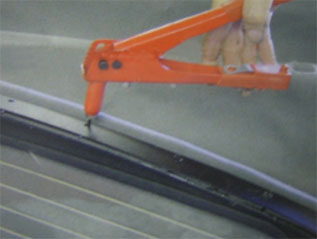
Below are figures 3 and 4 showing the straps being riveted in place. Both images were photographed by the person standing behind the car on the left hand (passenger) side, facing forward. Use the metal plate provided to clamp the straps in place. |
|||||
 |
|||||
Figure 3 |
|||||
 |
|||||
Figure 4 |
|||||
Place the hood over the frame on your car. You may need someone to help you do this. Line up the rear of the hood with the rear clamping bar. Hold the long metal strip supplied with the hood on top of the plastic seam (with the holes aligned) below the rear screen. The holes will line up with the holes in the rear clamping bar. Place a pop rivet through the central hole through the metal strip, the plastic seam, and through the bar. Secure the rivet using the complimentary pop rivet gun supplied by BAS. Work your way out to the sides, symmetrically, until you get right round to the end. You may find that it gets a little harder to align as you get close to the edges of the rear clamping bar, but with a little perseverance you will get there eventually. Figures 5 and 6 show this procedure being undertaken. You will find it a bit easier if you position the glass screen vertically before riveting the last 5 holes on each side. |
|||||
 |
 |
||||
Figure 5 |
Figure 6 |
||||
When you removed the old plastic screen, there was a metal plate with several bolts attached that bolted to the rear bow to clamp the plastic screen in place at the top (it's the same one you riveted the webbing straps to in figure 3). This obviously has clearance holes in it to accommodate the bolts for the old plastic screen clamp. A plastic “C” section strip is supplied with the BAS hood and this pops over the underside of the rear bow (opposite to the hood side) to cover the holes. Its fixed from the inside of the hood, and can be seen when sitting in the car when the hood is up. |
|||||
Next, thread the cables through the loops each side of the hood and re attach the cables to the front bow. A pair of thin nosed pliers helps here. |
|||||
Pull the hood cover over the front of the frame, putting the pockets on each side as shown in Figure 7. There are holes in the pockets for the metal teeth on the front bow to poke out of which are then clamped down using a hammer. It can be a bit of a stretch to get them in the correct place, get someone to support the frame in the partially open position as this helps. Close the hood to get correct location. Then open the hood to about half way and fix the side plastics with metal “rubber retainers” back on to the frame using the pop rivets provided. Rivet through the plastic, the plastic hood fabric seal (it has the holes pre-punched) and into the frame (figure 8). There should be enough grease on the rubbers to enable you to slide them back on again once the retainers are attached. |
|||||
 |
Figure 7 |
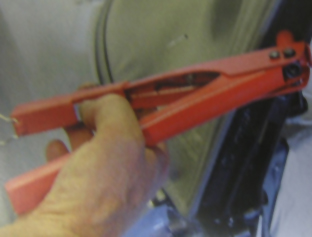 |
Figure 8 |
Fold
the hood forward again, and fix the hood clamps to the front bow, over
the plastic cover on the end of the hood. It's a more substantial front
fixture to the OEM vinyl one you removed earlier. You “may” need to
enlarge the holes in the plastic if you cannot get them to line up with
the metal holes in the front bow (Figure 9). Slacken the hood clamps by
turning the hex bolt inside to extend the clamp to its longest reach.
Then close the hood. You will find that it is very tight at first, and
you will need someone to help push the hood down whilst you clamp it
shut. |
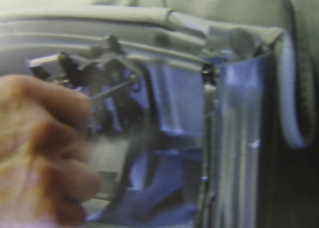 |
Figure 9 |
 |
Figure 10 |
This tension will relax when the fabric has stretched out a little. Leave the hood closed for 5-10 minutes, then adjust the clamps to take out any slack so that the front of the hood nestles against the front window seals as the old one did. Then knock on the snapon edge trim using a hammer, to secure the front plastic to the frame as in Figure 10. |
All that is left to do is climb into the car, close the hood (but don't clamp it shut) and open the Velcro listing and stick the adhesive strip to the relevant bow, and close the Velcro. Do not pull it to tightly or you will get a dip in the hood fabric when viewed from outside. |
Lastly, connect the heater element cable to the connector in the loom on the passenger side. It may be hidden under the parcel shelf carpet somewhere near the passenger side rear hard top clamp. If you do not have a rear demister switch and relay fitted, refer to the fitting instructions that come with that part. They are widely available through dealers via the Xpart network, or from places such as eBay. |
The wiring for the switch will be behind the blank switch cover in the centre console between front and rear fog lamps. The relay should be installed in to the empty socket on your fuse board located opposite fuse numbers 23 and 24, under the right hand side of the dashboard. Check that a 25A fuse is installed into location number 20. |
The part numbers are YUG 101480 PMA for early cars and YUG 102570 PMP for later cars. YWB 10027 is the part number for the relay. Cars after 2004 had a further change, your local MG dealership will be able to advise (or the MG forums!). It takes about 10 minutes to fit the switch and relay. |
When
the hood is fitted, and folded back, the hight from the parcel shelf to
the top of the centre of the front bow should be 8 inches. You might
require a special hood cover to accommodate the slight increase in
height. Sportster hood covers are available from XPower. |
| Images © 2005 BAS International and Text © 2006 Iain Ross | I accept NO responsibility if you attempt any of the mods on this site. If you mess it up - its your fault! |